
What Acoustic Treatment Do I NEED for a Home Studio?

This is the one question we get from just about everyone we talk to – and for good reason. Acoustics and the physics behind it can be an intimidating subject. The aim of this article is to simplify the topic of home studio acoustics, break it down into easy-to-implement strategies, and provide you with the knowledge to create the best possible acoustic environment for your studio. Let’s jump right in.
The core principles of home studio acoustics:
No matter the size, use, or layout of your space, if you follow these four principles you will be on your way to a great sounding home studio.
Order of operations. Treat areas of your room in this order: early reflections (ceiling and sidewalls), rear wall, front wall, corners, late reflections, soffit corners.
Bigger truly IS better. Or, more accurately, deeper is better. Depth is the only way to make acoustic panels work at low frequencies. There is nowhere in your room that will be better suited to a 2” deep acoustic panel than a 4”, 6”, or even 8” deep panel.
Air gaps are an acoustic panel’s best friend. Utilizing air gaps between acoustic panels and the boundary they are installed on will significantly increase their performance.
Expectations and budget. Home studios are imperfect, but that doesn’t mean you can’t make a Grammy-winning record in yours. Remember, not treating everything at once is OK. Follow the order of operations and utilize your budget to get the deepest panels you can while still covering your early reflections. Then, continue on from there as your budget allows, adding additional acoustic panels and bass traps over time.
Four questions to consider:
The four principles above will apply to every room; however, every engineer/artist/producer and their studio will be unique.
The four questions below inform the rest of the studio treatment process, tailoring it to you. If you can answer these four questions about your room, after finishing this article, you will be able to determine what acoustic treatments are right for your home studio.
Space. What are the dimensions and layout of your room? What are the physical limitations such as doors or windows? How much space are you willing to give up for acoustic treatments?
Use. What do you use the room for (e.g., mixing, recording, producing, writing, etc.)? For the rest of this article, we’ll assume the user is mixing.
Goal. What are your goals for the acoustics of your studio (e.g., creating a great sounding space to record, even decay times, better translation from the studio to the car, controlling room modes, etc.)?
Budget. How much would you like to invest in acoustic treatments for you and your studio?
Everything is better with examples, so let’s put the four principles and questions to use.
Below are examples of small, medium, and large home studios treated with budgets ranging from $500 all the way up to $10,000. For all of the examples in this article we’ll assume the use of the room is mixing.
*All of the budgets include the products shown and shipping costs in the U.S.
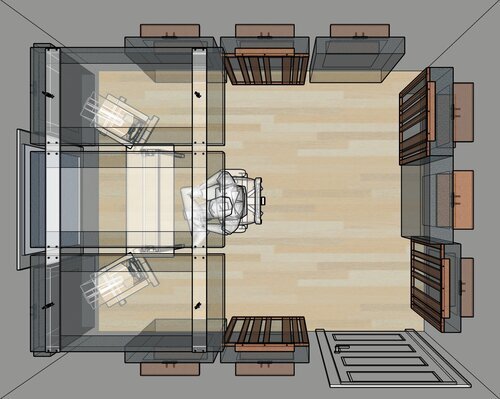
Treatment for a small home studio (8’x10’x8’)
Budget: $500
Select each drop down to see the details of this acoustic treatment setup.


〉Acoustic treatments
(x4) Broadband Acoustic Panels
〉What this treats
This treats your room's early reflections. Even with a minimal setup like this, you can treat the early reflections on the left, right, and rear walls, as well as the ceiling.
This will improve stereo imaging, add definition and clarity to you monitoring, and start to tame the echo and reverb in your room.
There is a lot to still be improved upon, but you will be off to a great start having a room that you can begin to learn and trust.
〉What this doesn't treat
Simply put – it won't treat the room's secondary and late reflections SBIR, as well as low frequencies.
Left untreated, the secondary and late reflections will result in the room being fairly live-sounding. This can make changes in eq, compression, and effects hard to hear as the reflections in the room will mask some of the direct sound from your speakers.
The lower frequencies will also go untreated. Broadband acoustic panels installed with a 4" air gap will work very effectively down to around 120Hz. Below that, the room is effectively untreated for now. The low frequency response in the room will lack balance and the decay of lower frequencies will be extended. We hear this as a lack of clarity, definition, and tightness in the bass.
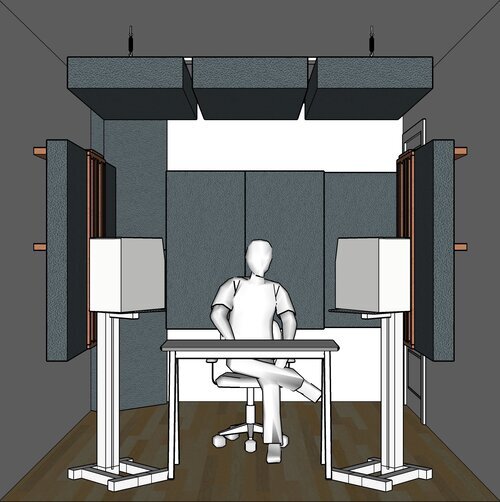
Budget: $1,000
〉Acoustic treatments
(x4) Broadband Acoustic Panels
(x3) Bass Trap Panels
〉What this treats
Here, the early reflections on the left, right, and rear walls are treated but the rear wall treatment is dramatically improved. Adding a second rear wall panel allows for the panels to be placed directly in the path of the first reflections off of the rear wall. If your speakers are positioned correctly (angled in ~30°) the first reflections off of the rear wall will not come from the center of the room, but actually much closer to the left and right corners.
The addition of a ceiling cloud configured of bass trap panels is a serious game changer. It will drastically improve the low-end response of the room by controlling the floor/ceiling axial mode. If you’ve been fighting with a big bump at the listening position around 120 to 140 Hz, this is the fix.
〉What this doesn't treat
We have started to tackle the floor-to-ceiling modes but have yet to make big improvements to the length and width modes. The room will still have imbalances in the low frequencies as a result, but overall, the monitoring will be significantly sharper, tighter, and clearer sounding.
As you can see in the images, there are still a large number of untreated surfaces that have the potential to cause speaker boundary interference reflections. These are responsible for the extremely sharp dips and peaks in the frequency response of most rooms.
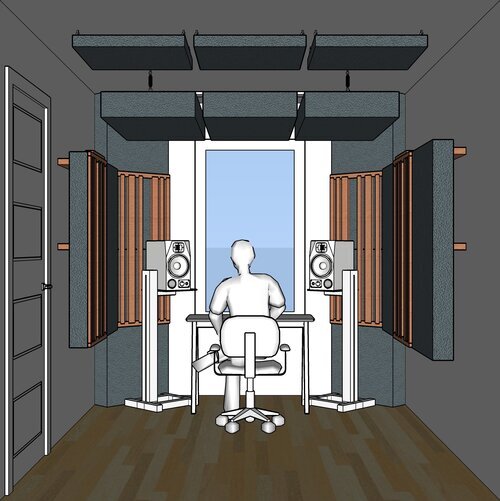
Budget: $2,000


〉Acoustic treatments
(x8) Broadband Acoustic Panels
(x5) Bass Trap Panels
(x4) Scatter Faces
〉What this treats
Now we are making some massive changes, including:
Early reflections, secondary reflections, speaker boundary interference reflections off of the front wall, front to back and floor to ceiling modes.
Bass trap panels on the rear wall will help tame the front-to-back axial mode. The cloud is still working its magic on the floor-to- ceiling mode. Together, the bass trap panels are starting to even out the low frequency response and decay in the room. This is the key to having a room that translates well from the car, to your phone, to headphones, ear buds, and beyond.
Broadband acoustic panels placed directly behind the speakers and in the back half of the room are limiting SBIR effects, making it easy to hear the slightest changes in balance, compression, effects, and performance.
The scatter faces aren’t there to just look awesome, they really do work wonders on room balancing the decay time, reducing fatigue, and improving the stereo image and depth of field.
〉What this doesn't treat
At this stage, we’ve made some huge improvements, but the corners of the room are still untreated, as is the back half of the ceiling.
Adding in bass traps to the corners will continue to bring down the low frequency decay time, making the room even more balanced.
Treating the ceiling in the back half of the room will make things sound great, not only at the listening position, but also throughout the rest of the room. As a bonus, if you are tracking vocals or anything else in the room, this will help your recordings tremendously.
Budget: $3,000


〉Acoustic treatments
(x5) Broadband Acoustic Panels
(x12) Bass Trap Panels
(x3) Hi-Mid Acoustic Panels
(x4) Scatter Faces
〉What this treats
Everything mentioned above at the $2,000 price point, plus the corners and ceiling in the back half of the room.
Adding bass trap acoustic panels to the three accessible corners of the room will make huge improvements to the room’s low frequency decay times. You’ll hear more consistent, and even tighter and defined, low-end out of your monitors, meaning you can trust what you hear and take less trips to the car checking your mixes.
Treating the remaining ceiling space will reduce any potential late reflections arriving at the listening position, but more importantly, the panels will make the back half of your room sound just as great as the front half.
〉What this doesn't treat
Only the lowest of the low frequencies. This goes back to the question of space – with the space limitations of home studios, treating sub frequencies is challenging. As you move into larger rooms over time, things will only improve.
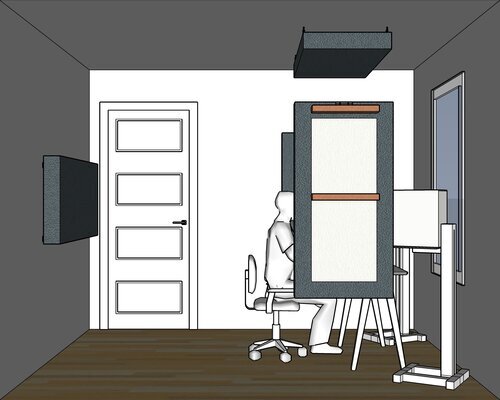
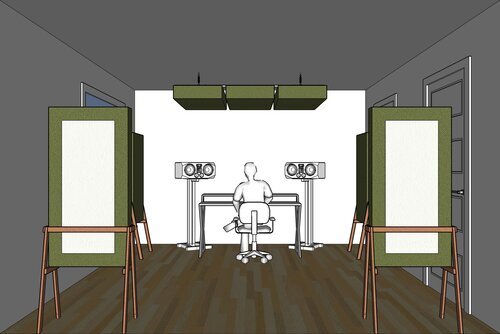
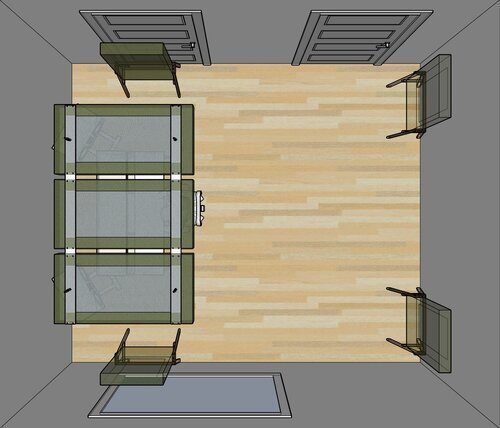
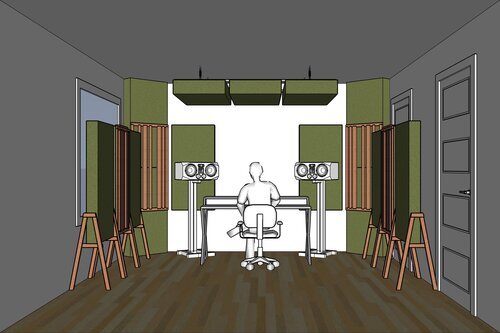
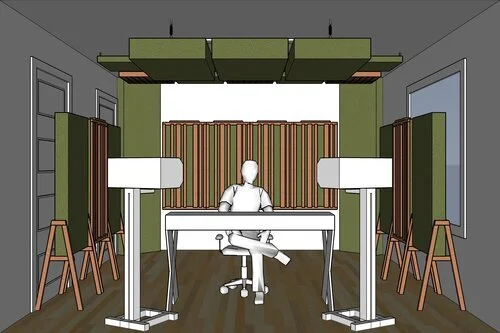
Treatment for a medium-sized home studio (12’x14’x8’)
Budget: $500
Select each drop down to see the details of this acoustic treatment setup.


〉Acoustic treatments
(x4) Broadband Acoustic Panels
(x2) Easel Acoustic Panel Stand
〉What this treats
Early reflections, and the ceiling:
Broadband acoustic panels placed at the left and right early reflection points will provide clarity and focus at the listening position and improve stereo imaging. The panels are shown on our Easel Acoustic Panel Stands, allowing them to be easily implemented in the room despite having a door and window at the early reflection points in the room. The EAPS have an added bonus of providing an air gap between the back of the panels and the wall, making them even more effective.
The two broadband acoustic panels installed as a cloud will absorb early reflections off of the ceiling, again improving clarity and focus at the listening position.
〉What this doesn't treat
The rear wall secondary and late reflections SBIR, and low frequencies:
Unlike the small room example, the rear wall here is untreated. With the larger 14’ length only having one panel centered on the rear wall would have very little effect.
As with the small home studio example, left untreated, the secondary and late reflections will result in the room being fairly live sounding. This can make changes in eq, compression, and effects hard to hear as the reflections in the room will mask some of the direct sound from your speakers.
And for the low frequencies – broadband acoustic panels installed with a 4" air gap will work very effectively down to around 120Hz. Below that, the room is effectively untreated for now. The low frequency response in the room will lack balance and the decay of lower frequencies will be extended. We hear this as a lack of clarity, definition, and tightness in the bass.
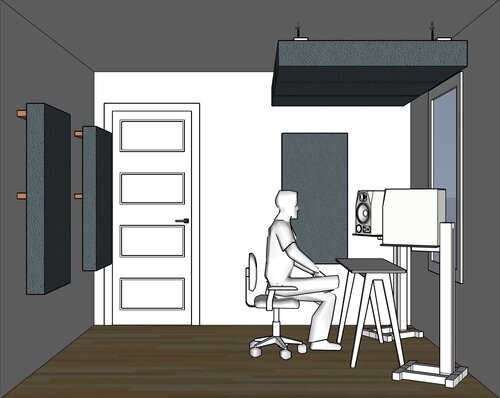
Budget: $1,200

〉Acoustic treatments
(x3) Bass Trap Panels
(x4) Broadband Acoustic Panels
(x4) Easel Acoustic Panel Stand
〉What this treats
Floor/Ceiling Mode, Early reflections:
Swapping out the smaller broadband panel cloud for a larger one made up of bass trap panels will make a world of difference to your monitoring experience. Home studios are plagued by low ceilings, which result in a large bump at 115Hz to 150Hz depending on the ceiling height. A ceiling cloud made up of Bass Trap Panels is deep enough to smooth this out, freeing you up to focus on the music and creativity.
With two additional broadband panels, the rear wall early reflections can now be treated as well. This will not only reduce echo/reverb and balance out the mid and high frequencies, but also start to smooth out some of the SBIR cancelations from the rear wall. The panels are shown on the EAPS stands to provide easy adjustability and an air gap but they can be wall mounted as well.
〉What this doesn't treat
Front to back and left to right axial modes, balancing low frequency decay times, speaker boundary interference reflections, late reflections.
There will still be imbalances in the low frequencies, but overall, the monitoring will really start to balance out and sound sharp, tight and clear.
As you can see in the images, there are still a large number of untreated surfaces that have the potential to cause speaker boundary interference reflections. These are responsible for the extremely sharp dips and peaks in the frequency response of most rooms.
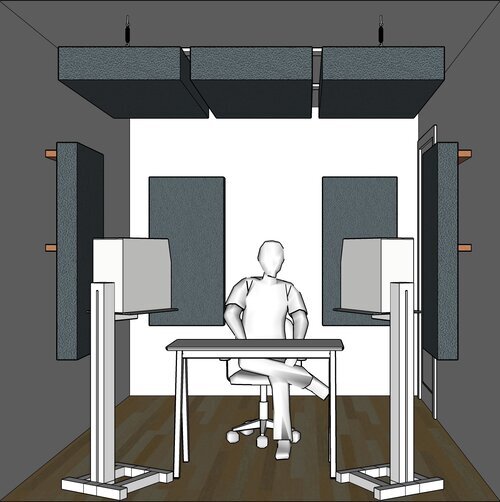
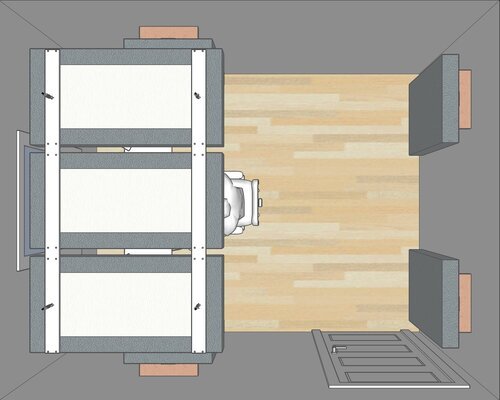
Budget: $2,200


〉Acoustic treatments
(x7) Bass Trap Panels
(x6) Broadband Acoustic Panels
(x4) Easel Acoustic Panel Stand
〉What this treats
Floor to Ceiling and Front to Back Modes, Early reflections, Front Wall SBIR, Rear Wall:
Now we are getting to the point where this would be a great room to work in, day in and day out. All of the critical surfaces are treated, and the low-mid and low frequencies will be well controlled by the bass trap acoustic panels.
〉What this doesn't treat
Low frequencies will still be decaying at a longer rate then mid and high frequencies. This will leave the room lacking a bit in balance and definition in the low end.
It will also apply to ceiling reflections in the back half of the room.
Budget: $4,500


〉Acoustic treatments
(x15) Bass Trap Panels
(x8) Broadband Acoustic Panels
(x8) Scatter Faces
(x6) Easel Acoustic Panel Stand
〉What this treats
Floor-to-ceiling and front-to-back modes, early reflections, front wall SBIR, rear wall, corners:
With the introduction of corner bass trap panels, we will start to see the low frequency decay times in the room come into check. The scatter faces will prevent the room from being too dry in the mid and high frequencies providing a balanced decay time throughout the frequency response. This is the mark of a great mixing or critical listening environment.
〉What this doesn't treat
The list of things left untreated is getting pretty short now. The only critical missing piece here is the ceiling in the back half of the room. Left untreated, the surface will cause distracting echoes in the back half of the room as well as contribute to late reflections that will distort the sound field at the listening position.
Budget: $5,500


〉Acoustic treatments
(x15) Bass Trap Panels
(x8) Broadband Acoustic Panels
(x8) Scatter Faces
(x5) Space Coupling Diffusers
(x5) Hi-Mid Acoustic Panels
(x6) Easel Acoustic Panel Stand
〉What this treats
Everything mentioned above, plus the ceiling in the back half of the room.
As we mentioned earlier, treating the remaining ceiling space will reduce any potential late reflections arriving at the listening position, but more importantly, the panels will make the back half of your room sound just as great as the front half.
〉What this doesn't treat
Just like our final example for the small studio set up, this room is still a little too small to truly treat sub frequencies. There simply is not enough room for acoustic treatments to be large enough to be effective at the lowest frequencies. There are still a few untreated surfaces above and below the panels. No wall or ceiling surface would be left untreated in a high-end commercial studio, but for a home studio set up, this hits all of the critical marks.
Treatment for a large home studio (12’x17’x9’)
Budget: $10,000
Select each drop down to see the details of this acoustic treatment setup.


〉Acoustic treatments
(x37) Bass Trap Panels 4’x2’
(x5) Bass Trap Panels 4’x1’
(x2) Hi-Mid Acoustic Panels
(x6) Scatter Faces
(x4) Space Coupling Diffusers
(x2) Primitive Root Diffusers
〉What this treats
Everything:
For a home studio this is pretty much the dream setup. The doors and windows are in positions that still allow for treating the critical early reflection points and large corner bass traps.
Note the corers are still treated with the 4’x2’x6.5” bass trap panels, but they are now oriented horizontally greatly increasing the air gap behind them making them effective all the way down to 40Hz. The ceiling/wall corners are treated as well, providing even more low frequency decay time control.
Not only is this room large enough for the additional low-end absorption, it has the depth needed to make rear wall diffusion highly effective. The primitive root diffusers on the back wall will work with the scatter faces and space coupling diffusers to deliver and beautifully balanced, defined, and accurate monitoring environment.
〉What this doesn't treat
This pretty much covers it all. We hope you have the opportunity to have a home studio as inspiring as this one day.
Woah, that’s a lot of acoustic panels!
Are you sure I need all of that?
Truthfully, only you can provide the answer to this question and it will always relate back to your goals for the space.
Rooms cause massive distortions to the frequency response and produce incredibly uneven decay times. We use acoustic treatments to balance the frequency response, smooth the decay times, and create a more accurate and reliable space for you to work in.
It is important to remember that at the end of the day, YOU will always be YOU. The room you work in doesn’t change the sounds you hear in your head that you spend hours chasing to perfect a song. It changes how long and hard you have to work to get there, how many trips to the car you have to take to finish the mix, and how creative you could be in the process.
Whether you’re in an untreated cube or in an incredible-sounding studio, your work will always be reflective of you. In a well-treated studio, you’ll be able to trust what you hear from your monitors, work faster and more confidently, take fewer trips to the car, and most importantly you’ll be more CREATIVE.